The bottom picture was the inspiration for my most recent project. I love the muted grey and the size of the piece to hang over the fireplace in our still-in-progress-3rd-room. Remember, this one (taken before we painted the new doors):

This fireplace definitely needed sprucing up but it took me a while to decide which route I wanted to go. I wanted something that wasn't too expensive, because, let's face it, we're just not the "fine art" type of people. Plus I know myself, and I eventually get tired of things and replace them so I didn't want to invest a lot. So I decided to DIY the chevron print above.
First I thought I would buy a large canvas to use. I patiently waited until they were 1/2 price at Michael's and got one. But once I got it home, I realized it wasn't big enough or the right shape. I wanted more of a square and all of the canvases were too rectangular; so I had to think of an alternative. While I was there I did pick up some acrylic paint in grey and white that I planned to mix for the perfect shade of light grey.

And I found these pieces of craft wood that I thought would make the perfect chevron pattern. I bought four pieces of this 1/8 x 4 x 12" birch plywood, and I think they were around $2-3 each.

I used gorilla glue to hold the 4 pieces together to make my pattern, which I figured would be much easier than using my yard stick and measuring each stripe to be equidistant from the next.

When I got home from the second trip to Michael's, I used painter's tape to tape off the exact size/ shape I wanted. I got my exact measurements and headed to Lowe's. After looking at the different types of wood, I decided to go with birch wood because it has a very smooth surface which would make the prime/paint steps easier. The guy at Lowe's cut it to size and I was off to the paint department.
I knew I was going to do this project in the house so I opted to use the Olympic no VOC paint because it has less fumes and is more environmentally friendly. Plus I've really wanted to try this kind for a while so a project like this was the perfect test. I bought one quart of the off the shelf white color and had them stir/shake it for me. Now it was time to head home and get started.
I knew I was going to do this project in the house so I opted to use the Olympic no VOC paint because it has less fumes and is more environmentally friendly. Plus I've really wanted to try this kind for a while so a project like this was the perfect test. I bought one quart of the off the shelf white color and had them stir/shake it for me. Now it was time to head home and get started.


I painted both sides of the wood so that it would look/feel more like a real piece of art. The wood really soaked up the first coat of paint so I ended up putting 3 coats on each side. Here it is after one coat:

Here is after 3 coats:

I will say that this project had a LOT of wait time so it was definitely not a one-day project. More like 4 or 5 days. I waited one full day after painting the back before I turned it over to paint the front side to avoid smudges or sticking to the plastic drop cloth. Once I got the front side completely covered with white, the fun began:)
Using my handy little chevron pattern, I lightly traced it over the whole board. Then I used painter's tape, taping on the inside of the bands that were to remain white. This way each band would be the same width, if that makes sense;) I also labeled each space that would be painted grey with a "G" so that I wouldn't get confused, paint the wrong band grey and have to fix it later. It worked pretty well! :)


Once the whole board was taped, I mixed my grey to what I thought was a perfect light grey. Wrong. It went on a whole lot darker.

Yeah, it took me until I finished the whole piece to realize it was darker that I really wanted so I mixed some more paint that was a little lighter shade of grey. It still wasn't as light as I wanted, like my inspiration picture, but I was ready to be finished! :)

I let all of the paint set for a day or 2 before taking off the tape. I had a few placed to touch up and then I sprayed a clear coat of gloss on it for protection and so that it could be wiped clean. Here's the final product on the mantle!

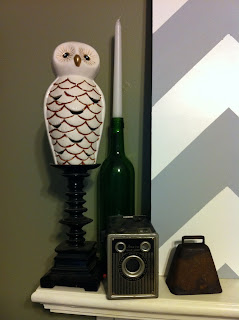
I thought it turned out pretty well. Now the fireplace just needed some accessorizing! I used a few things from other rooms in the house, like this owl and wine bottle/candle holder from the living room. I perched the owl on an old candle holder to give him a little height. I finally used my vintage cameras and a small cow bell that was my dad's.
On the other side is this cool, metal film spool I picked up from Pier 1 last weekend and my other vintage camera.

So here is the final look of the fireplace, for now anyways! :)

The next thing I want to do in here is DIY some new curtains to hang on each side of the fireplace for the closet doors and get a round area rug to offset all of the straight lines in here. I'm thinking something like this found here:

That's all for now! :)
Using my handy little chevron pattern, I lightly traced it over the whole board. Then I used painter's tape, taping on the inside of the bands that were to remain white. This way each band would be the same width, if that makes sense;) I also labeled each space that would be painted grey with a "G" so that I wouldn't get confused, paint the wrong band grey and have to fix it later. It worked pretty well! :)


Once the whole board was taped, I mixed my grey to what I thought was a perfect light grey. Wrong. It went on a whole lot darker.

Yeah, it took me until I finished the whole piece to realize it was darker that I really wanted so I mixed some more paint that was a little lighter shade of grey. It still wasn't as light as I wanted, like my inspiration picture, but I was ready to be finished! :)

I let all of the paint set for a day or 2 before taking off the tape. I had a few placed to touch up and then I sprayed a clear coat of gloss on it for protection and so that it could be wiped clean. Here's the final product on the mantle!

I thought it turned out pretty well. Now the fireplace just needed some accessorizing! I used a few things from other rooms in the house, like this owl and wine bottle/candle holder from the living room. I perched the owl on an old candle holder to give him a little height. I finally used my vintage cameras and a small cow bell that was my dad's.

On the other side is this cool, metal film spool I picked up from Pier 1 last weekend and my other vintage camera.

So here is the final look of the fireplace, for now anyways! :)

The next thing I want to do in here is DIY some new curtains to hang on each side of the fireplace for the closet doors and get a round area rug to offset all of the straight lines in here. I'm thinking something like this found here:
That's all for now! :)


