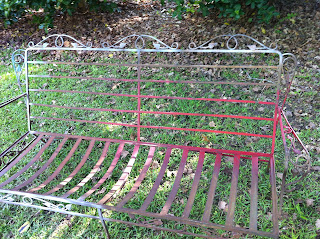
We have really been enjoying our new-to-us couch on the screened porch! Mainly at night we lay out there and read- because it's too hot any other time of the day. But it will be perfect this fall, when it finally cools off, and we can sit out there to drink our morning coffee. :) So now I must show you how it turned out! There are still a few small things I might change but here is the before and after:
Btw, the blue/white throw pillows aren't for this, but I needed some for the picture so I stole these from another room. This was the 4th of July weekend so it kind of worked out and looked patriotic. :)
In the last post I told you about the seat and back cushions- all I had to do to finish it was make pillow covers. Well that's just what I did a couple of weekends ago! First, I found some outdoor fabric on sale from Jo Ann Fabrics' website- this canvas fabric is what I decided to use since it would be versatile, plus it was on sale for $7.99/ yard, as compared to the regular price of $19.99/ yard! I bought 5 yards just to be safe, and I have a ton of it left! :) But, better safe than sorry, right?
I found the red printed fabrics at Wal-Mart. The one I shop at doesn't have a fabric department anymore, but they have started selling these 2- yard, pre-cut packages of fabric. They were on sale for $5 each!
I really like the pattern on the right because it reminded me of this from West Elm:
So now to the part on how I made them. Items needed include: scissors, pins, fabric (of course), iron, and sewing machine.
I used the same method to make each envelope sham that I found here. First, for the front of the euro sham, cut a piece of fabric 27" square (the pillow is 26" square). For the back, cut 2 pieces, each 15 1/2" tall and 27" wide (the same width as the front piece and half the height plus 2 inches). These measurements would allow an overlapping envelope to insert the pillow.
On the back of each smaller piece, fold the long edge of fabric over 1/4" toward the wrong side of the fabric (I ironed this to reinforce the fold), then fold it another 1/4". Pin and iron the edge before stitching it to make a hem.
Once this has been done for both pieces, pin the 3 pieces together. Lay the front piece of the euro sham fabric side up. Then lay the two back pieces fabric side down, with the hemmed edges overlapping each other.
Pin all around the edges of the sham and stitch them together using a a 1/4" seam allowance.
Finally you just turn the sham right side out and insert the pillow. Easy peasy! Now I just had to do this 4 more times! :)
Of course I had to change my measurements for the seat cushions as they are longer but I used the same calculations. We did have to make a minor change to the seat cushions. Because they are 4 inches thick, my mom mitered the corners of each sham to create that nice little edge. First, she measured 2 inches from the corner seam and marked that spot.
Then she drew a line connecting the 2 marks and stitched along that line.
Next, she trimmed off the excess fabric.
She did this for each corner and this extra step made the seat cushions look a little more "finished" if that makes sense. Of course, there are several different ways I could have made these covers, but this was a pretty easy process. Definitely a "beginner" sewing project. And it will be easy to change out the euro shams once I'm bored of the red print! :)
So here is another shot of our new favorite lounging spot!


I love it! You are so creative.
ReplyDelete