Tuesday, April 12, 2011

Ready for Houseguests!

If you remember from an earlier post, when we moved into our house, our guest room was looking a little sparse. Essentially, all we had was a bed. The walls, trim, and ceiling were all the same color, which didn't really work for me because I love color!! But the room did have beautiful original hardwood floors, a decent sized closet, and a charming built- in bookcase. So this was definitely a blank canvas that we had to work with, which made it hard to decide which direction I wanted to take this room.


This is Matthew's full size bed from college and the frame sits way to low to the floor (I couldn't even fit an under-the-bed-storage container underneath). So I bought a set of 4 bed risers and I really like how it sits a little higher now.

For a while, we kept the neutral walls because we went through an 8 month period of trying to sell our house. Once we took it off the market, I was ready to throw some color on those walls! I went with Cafe Blue from Valspar because it was a mix of turquoise and baby blue (and I love turquoise). I wanted a serene color on the walls so that we could later add splashes of color in the decor. I'm very happy with the way this color turned out.

The next project on my list for this room was a headboard. I didn't want to spend a lot since it's for the guest room and one of the blogs I follow, the infamous Young House Love, conveniently posted directions on how to make an upholstered headboard. So I thought I'd give it a try; I mean, it couldn't be too hard, right? 
 
First I measured on the wall how big I wanted my headboard. I easily did this by putting painter's tape on the wall in the silhouette of the headboard. Once I had my measurements, off I went to HD to buy a piece of plywood, which they cut for free! While I was there I needed to buy a staple gun and staples, since this was my first upholstering project. My grand total here came to around $20.  My next stop was Hancock's Fabrics to pick up some batting and fabric. I thought an earthy lime green color would look nice with the wall color, and luckily they had it and it was 50% off (I got upholstery fabric because it's thick and easy to work with). I bought 2 1/2 or 3 yards of fabric and the same amount of the thick 2" batting, which was also on sale. Grand total here was $25. So my new headboard cost around 45 bucks, not too shabby.

Matthew was sick one Friday and went to bed early so I used this as an opportunity to work on my project (of course I was as quiet as I could be with a staple gun, but I did close the bedroom door). Luckily, he had taken nyquil so I didn't bother him ;) First, I laid out the batting and then centered the plywood on it. There wasn't too much overhang so I didn't bother trimming it yet. To get started, I pulled the batting very tightly and stapled at 12, 6, 3 and 9 o'clock. The most important thing is to make sure you are pulling the batting very tightly- you don't want any loose gaps. Then I just stapled every 1/2" or so all around the board until the fabric and batting were both secure and free from loose gaps.
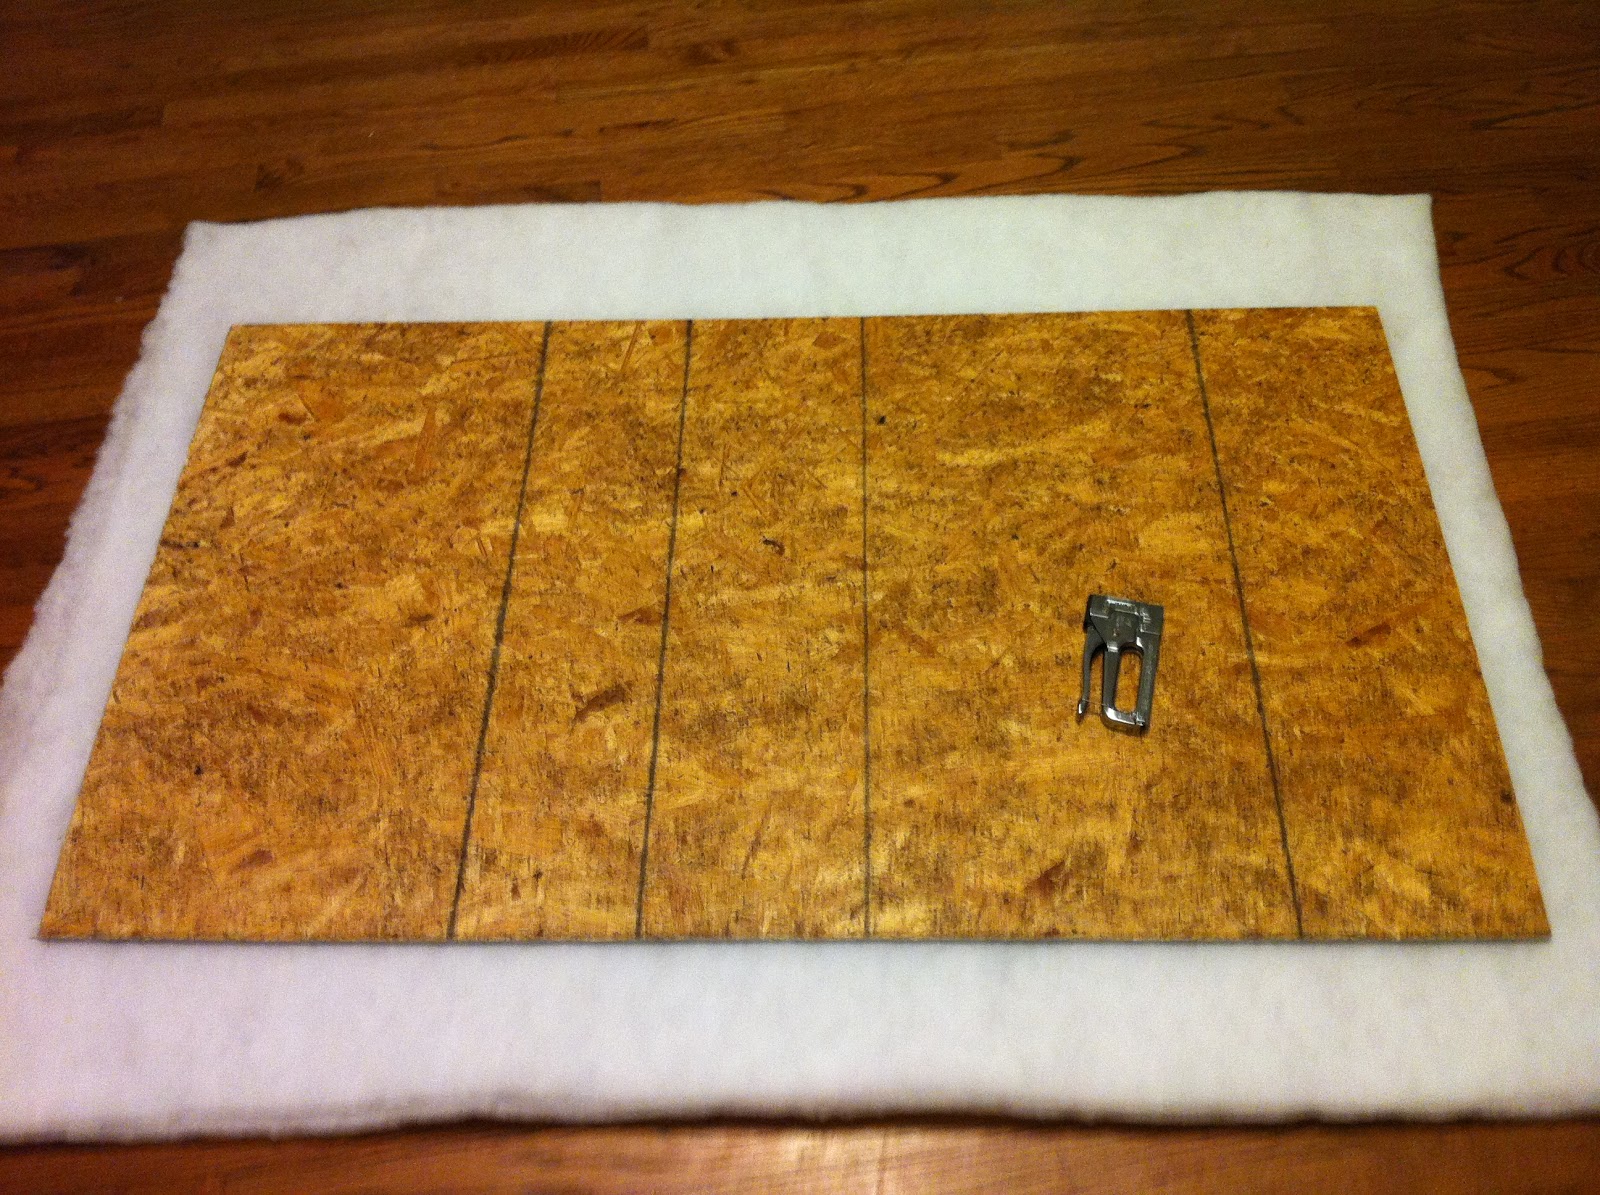


After the batting was stapled, I trimmed the overhang and then repeated the process with the fabric. Then  voila, you have a headboard, almost.


The next day, Matthew was feeling much better so he went to HD and got a picture hanging kit so that we could hang our new headboard. He did a great job hanging/ centering it! Here it is:


So the room was beginning to come together but it wasn't near complete. While I was home for Christmas, I was looking around my parent's house and I came across a lamp that was in the office/ sewing room. My parents have had that lamp since before I was born! The base was brass with a big black drum shade. I immediately saw potential :) So my generous mother gave me the lamp and now it was just a matter of deciding  what color I wanted to paint the base. I decided on yellow! (sorry for no before pics but just imagine a rusted brass color)


 I was trying to find some shams and decorative pillows that would coordinate with the room and headboard when I saw this post on Young House Love and loved the shams on their guest bed. I had seen them on Pottery Barn website so I ordered those and then picked up a few throw pillows from Target.


Once I got the pillows on the bed and chair in the corner, I wasn't loving that black lamp shade. I thought about recovering it with a fun print but eventually I just replaced it with this shade from Target. I think it really lightens up the room better.


I also added a mirror in here. Remember this mirror in our living room when we first moved in?


Well I decided to hit it with some earthy lime green spray paint. I think it looks great in here, especially with the green headboard.


Here's the other wall in the guest room. It currently has an old chest that I want to either paint or stain, when the time comes. (please excuse the mess on top and laundry basket) The door on the left is the closet. 


So there you have it, our guest room went from looking like this:

to this: 


Now all we need to add is some art, curtains, and a rug. 

Monday, April 11, 2011

Who doesn't love a $20 find??

First off, Happy Monday everyone! Hope you were able to enjoy the beautiful weekend! :) I spent it in Savannah, GA with my mom, sister, and aunt- early birthday present for mom! Savannah is very special to me because that's where my husband, Matthew, popped the question 4 years ago:)

So a few weeks ago, I went to an antique/ thrift store in town. (The same one I found my Pepsi bin that's in my kitchen). Sitting outside were 4 small folding chairs that needed some serious TLC. They were bright yellow and had peeling contact paper on the seats in a super 70s flower print of yellow, orange, and green. We had recently had people over to our house and needed a few extra chairs so I thought these would be perfect. Inexpensive? check. Multiple uses? check. Good bones? check. So I went home with these not-so-lovely-at-the-time chairs:
The chairs after I began peeling off the contact paper

Again, and a little rusty in places


So after a lot of elbow grease, I was able to get the paper off. Next, I sprayed on a coat of primer and then 3 light coats of spray paint in a very soothing celadon color. They are currently spaced out throughout the house, but when we have guests over again, they can definitely be used for additional seating. There are still some imperfections so I eventually want to make some small cushions for these, but they work for now. Best part is, if we're not using them, they fold up very nicely for storage!

These 2 made their home on our screened-in porch

This one lives in the guest room as a plant stand

This one houses our coffee pot, for now...
That's all for now! Stay tuned...

Monday, April 4, 2011

Let's play Catch! (up)

Ok, so here's my attempt to catch you up on how our living room currently looks. There are some features in this room that we love, like that huge picture window (actually this house has quite an abundance of windows which we certainly love), the fireplace, hardwood floors, etc... The previous owners used this room as one large space just for the living room, but we decided to rearrange it a bit so that there was a more defined entry way. I didn't like the idea of walking in right in front of the t.v.  Remember this is how it looked when we moved in, again just with our furniture from college:


Since this is the room where we spend 90% of our time, it has changed a bit over the years, especially as our style has developed. The color on the walls was a little to peachy especially since we have red furniture so we painted. I wanted a taupe/ gray color and thought it would be easy to find. Err... wrong! Picking out a color for this room was quite a challenge because there's no overhead light, so colors look differently in the day than they do at night. Therefore, colors we thought would look great, didn't quite turn out that way. Thank goodness for $2.50 samples at Lowe's! I bought 5 in one night and my favorite before I tested it, actually turned out to look like a blue/gray color. I'm soo glad I hadn't wasted 35 bucks on a gallon of that, because sometimes that's how I decide on a paint color- just go with my instinct :) So anyway, we finally went with Stone Manor by Valspar and really love it!

Here's the gallery wall for the entryway.
We also desperately needed to paint the trim throughout our whole house. This was a project that I knew would have a great effect, but I just couldn't psyche myself up for it (yes, it took me over 2 years to finally get around to it). But as I learned more about types of paint and where to use them, I realized that the previous owners had painted all of the trim with flat paint! I know, right? So of course that means it can't be wiped off and cleaned. So that equals over 5 years worth of dust and dirt just chillin' on our trim. Not cool! So I finally got around to picking out a color. I didn't want a stark white or even a soft white, so I decided on Ivory Dust, again by Valspar -maybe I should buy stock in Valspar paint:) And yes, this had the WOW factor. Everything just looked so crisp and clean, like it should. And now, if it gets dirty, I can just wipe it off! Now I will say that it took me an entire weekend, even after my sweet husband decided to join in on the fun and paint the doors (and he hates to paint!) Not to mention I was pretty sore from all of the squatting, sitting, climbing a ladder, etc... and I was right in the middle of my marathon training so it took me even longer to recover. But, looking at it now, it was definitely worth a week of uncomfortableness  :)

So here are some pics of our living room now:

Looking into the LR from the Dining Room


Looking into the LR from the front door


The more defined entryway I mentioned earlier


We have purchased a few things for this room since moving in. Our coffee table, end table, console, and telephone table are from the Sourav collection at World Market. We love that it's made of real wood and with  the hammered top, scratches and imperfections don't stand out, it just gives them more character. We also got an 8x10 jute rug from World Market , which we love the natural look of, a few lamps and some other decorations too.

Now, I'm not sure if I've already mentioned this, but I read several house blogs and use lots of ideas I find in our own house; I mean why try to reinvent the wheel for everything, right? If you haven't checked these out you definitely are missing out: Young House Love (this is my favorite), Restoration House, Shabby Chic Cottage, and you can always check out Ana-White if you're in the mood to build something:) So that brings me to my current spring mantel. I was on Restoration House one day and she posted this lovely spring mantel:


I immediately fell in love with how fresh and green it is but with a little rustic flair in the driftwood, so I began planning. We were going to the beach in the next few weeks and I wanted to look for a long, irregular piece of driftwood to put on the mantel. Score! I found exactly what I had pictured in my mind!


So to incorporate the greenery, I got an idea from Pottery Barn. In their latest garden issue, they are selling these moss-covered initials for $79!


I loved the look of these but thought there is no way I would spend 80 bucks for a letter with moss on it! So, enter Hobby Lobby. I bought a 10 inch wreath for $10, a few bags of live moss (the dark green and light green), a styrofoam ball- the size you use for Jupiter when you make the solar system in elementary school,  and some craft glue. A few hours later, I was up to my elbows in moss, which really smells bad so I recommend this project for outdoors, and voila, I have greenery for my spring mantel :)


I had taken a trip to the thrift store earlier and scored those 3 white vases for $3 so I had an idea for the size of styrofoam ball I would need. I also used some smaller pieces of driftwood in the candle holders. I usually have a mirror hanging over the mantel, but I wanted to see how it looked without it... a little too bare, don't you think?


I also added some candles and played with the arrangement of everything until I finally reached this:

And said... "Finito"

Friday, April 1, 2011

Productive lunch break? Yes please!

I'm going to show you just how productive one can be on an hour lunch break! My lunch break consists of driving to the house (10 minutes) and driving back to the office (10 minutes), so that leaves 40 minutes of free time at the house. (Yes, you can accomplish a lot in 40 minutes!) Sure, there are days when I might watch some tv, take the dogs to run and play for a few minutes, etc... but sometimes, that isn't enough- I like to be productive! So I'll show you 2 separate "lunch projects" from the past 2 weeks!

Lunch Day # 1
The first lunch project actually took 2 days. The first day, I was driving home on my normal route and passed a new thrift store that I had been wanting to check out. So I stopped by and 10 minutes later left with these items for less than $10:


Yep, that's 5 picture frames (1 8x10, 3 5x7, and 1 4x6) and a set of book-ends for $9! I had been looking for some vintage frames for a while because we have some old portraits of our grandparents that we wanted to frame/ hang. So these were perfect! The frames we gold, which I'm not a huge fan of, so I swung by Home Depot after this to pick up a can of spray paint. I wasn't sure what color I wanted to paint the frames, something bright and bold, but I really wanted the book-ends painted a fushia-ish color to go in the guest room. Well I couldn't find the fushia color but I did find a peacock teal color that I loved. Yay!

Lunch Day #2
When I got home for lunch the next day, I quickly put on some old clothes and got to painting! Painting the 5 frames took about 10 minutes.


However, I did learn a pretty good lesson about spray paint today. It does not wash off easily like regular paint does so this is how my hands looked afterward, since I had to hold the frames to get all of the sides and back painted. I looked like one of the Na'Vi people...


Good thing the painting only took 10 minutes because I spent the rest of my time cleaning off my hand! I tried removing it with nail polish remover. Of course, I used my "cheap" remover because I didn't want to waste the good stuff.

Result: Fail.


 Maybe it didn't work as well because it's "all-natural with no harsh chemicals". I guess I needed the harsh chemicals! But there was NO way I was going back to work with blue fingers! So that's when I broke out the good stuff. Seriously girls, this is the best polish remover I've ever come across, thanks to my mom!


It is a little pricey at $10 for a small bottle, but it's totally worth it. Especially if you like to paint your nails dark colors, which I do. I can paint mine a deep crimson and when I use this remover, I'm not left with pink-ish colored stained nails! Anywho, here's how well it worked on my smurf fingers:


So, when I got home from work that night, yes I get home at 9:30 :( , I put my photos in the frames and hung them in the hallway:

 Left to right, top to bottom: my grandmother, my grandfather (my mom's parents), Matthew's grandparents, and the bottom is a class photo when my dad was in 1st grade. :) Here is how they look with our other pictures in the hallway.


I'll show you how the book-ends turned out when I post our guest room :)

Lunch project #2

I actually completed this mini-project yesterday. It was a freebie since I already had the paint and brush from when I was picking out a trim color- I probably bought 4 or 5 samples until finding the right one. So while I was getting ready one day, I realized that the inside of our medicine cabinets, in both bathrooms, needed some serious TLC. These have been here since the house was built in 1952, so it was about time! This wasn't anything major, so I'll just show you the before and after pics.  Here is the hall bath before I cleaned it and put a fresh coat of pain inside:


Looks pretty gross, huh? 5 minutes later, voila...


And now for the master bath- it was in worst shape...


I know, right? That metal had rusted in places and I definitely don't want my toothbrush anywhere near that! But it's much better now...


So it didn't cost anything, and only took about 10 minutes, but these old medicine cabinet look so much better. Just fyi, I had thought about removing them entirely, but since they're from the 50s, I'm afraid it might expose lead paint. Does anyone know anything about that??

Stay tuned for more!