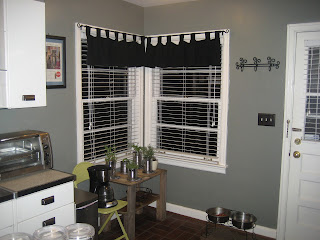
So we first tried painting it a light yellow and unfortunately that didn't look very pretty. It just really washed everything out. So we went with a darker color called Mark Twain House Olive from Lowe's. (Valspar Signature, my fave) We loved the color and how it added contrast to the white cabinets and trim. Now, about the hardware on those cabinets and drawers. I know this is a "vintage" kitchen complete with metal cabinets, and I love vintage, however I didn't really care for the cabinet hardware. Before shopping for something different, I tried taking one off and found that there is an actual cutout where the hardware goes. So that really limited the type of hardware that I could replace it with. But I finally found some at Target, and at $4.99 a pop, this project totaled a little over $100 since we needed 20. With a fresh coat of white paint on those cabinets, actually it's Ivory Dust, again Valspar Signature in Semi-Gloss, the new oil rubbed bronze hardware totally transformed the look of our kitchen.
Another small project was replacing our old faucet with an oil rubbed bronze one to coordinate with our new hardware. We ordered this one from www.overstock.com for around $80, and you can't beat that $2.95 shipping! This was Matthew's first plumbing project, and he rocked it! I was definitely impressed :)
The next project we talked was the empty space above the range. I would have love to install a hood vent, but that would have require a lot more work than we really wanted to do. So we decided to purchase something to hang our pots and pans. This turned out to be one of the most useful and practical purchases thus far! We love it and it only cost around $150. Once it arrived, it was just a matter of finding the studs to hang it on since it would be supporting so much weight.
Since we do do lack some counter space, we decided to purchase a small island. We went with a stainless steel one from Target. I think we paid around $100 for it and it's been great for additional storage and workspace.
The vintage Pepsi bin on the bottom rack is a purchase I made a few weeks ago while my mom was visiting. We hadn't really used the bottom rack much, and we needed a place to keep fresh produce, so this has worked out well. It was $10 at a local antique store.
Here are a few more pictures of our kitchen these days. Of course, I would have loved to gut it and build my dream kitchen, a cottage style kitchen with a farmhouse sink, but that really wasn't a part of our plan for this house. So we made it work for us! We replaced the light switch covers with oil rubbed bronze ones from Target and added some art and other decor.Still on my to-do list are replacing those "faux brick" floors, upgrading our range to stainless, and maybe replacing the countertops with dark butcher block or stained concrete, so I'll update you on that when/ if the time comes.
The final project for the kitchen that I can think of is the herb garden in the corner. After buying my herbs from the local Lowe's at $3.50 a piece, I used old soup/ vegetable cans to pot them. Most of these are the jumbo size that you would to feed a feast, but this was a look I was going for and cheaper than buying 5 flower pots. I soaked the cans for a couple of hours to remove the labels, drilled a few small holes in the bottom, and voila I was done! Also, I bought 5 of the medium- size round cork trays and painted them with chalkboard paint. Just remember, anytime you paint a surface with chalkboard paint you have to prime the new surface before writing on it. You do this by shading it with the long side of the chalk. Then erase it and it's ready for use! (the little table they're on was from the same antique store as the Pepsi bin, for $5!)
So that's pretty much how our kitchen went from this:
to this:


No comments:
Post a Comment
I would love to hear from you! Please leave a comment or become a follower of my blog! Thanks so much!