Friday, May 27, 2011

New towel bin

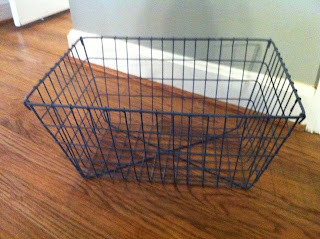
You may remember from a previous post that our master bathroom is extremely tiny, so we don't really have any floor space for a cabinet to hold towels, toiletries, etc... Well I had an old metal bin in the garage that my mom saved for me when she was cleaning. It was rusty, lifeless, and not much to look at. But it was very sturdy and in good shape, besides the rust. I was having a spray paint party yesterday for some picture frames that I picked up from the thrift store. Remember, I'm wanting to spruce up my gallery wall to something like these:


Anyway, I was out in the garage painting my frames and saw the old metal bin. I decided to show him some love and give him a fresh coat of primer/paint- a dark gray, almost charcoal color. It turned out pretty well so I was thinking about what I could use it for. Then it hit me! I could roll up our white bath towels and put them in here, since they were currently stacked in the floor. I thought it would be a useful and appealing way to store the towels.


So my original plan was to put my new towel bin under the sink because I'm going to make a sink skirt like the one I made here for the guest bathroom. But I didn't want anything taking up floor space, since it's already very limited. I got Matthew to come hold it against the wall to see how it would look hanging and I actually liked it! So I threw 2 nails on the wall and hung my new towel bin!


I had to hang it low enough so that we could actually reach the towels and this left too much empty space above. I tried visualizing a picture above it but I didn't really have anything at home to use. Then I remembered I had a bunch of driftwood leftover from my spring mantel project, so I went out to the garage and grabbed 2 somewhat similar pieces. Of course, I didn't want to put any nails in the wall for what would probably just be a temporary solution so I used some good ole' duct tape to hold these babies! They're actually very light because they're hollow so it did the trick for now.


So that's how it looks for now. I may decide later that I hate it and take it down, who knows?! I'm currently shopping for a new shower curtain, bath mat, and fabric to use for a sink skirt and curtains. Here are 2 shower curtains that I'm considering:



We'll see and I'll keep you updated! What do you think of the hanging towel bin?

Wednesday, May 25, 2011

Thrifted lamps... yes, please!

A few weeks ago, I decided I wanted some different lamps for our master bedroom, which is still a work-in-progress. Since I had recently bought some from Target, that I'm over now, I knew I couldn't justify buying brand new lamps to my husband (although we are going to use the old lamps in the office). Enter the thrift store. I picked up 2 ceramic lamp bases for less than $12! They both have the same shape- one was green and the other was white.

Notice all of the extra driftwood in the background, haha!
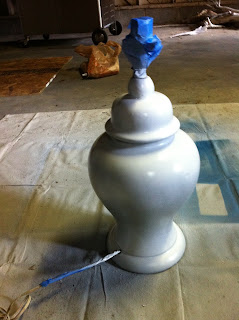
I decided that I wanted the bases to be white and luckily, one already was. So I googled how to paint ceramic and got busy. First I needed to sand it down with fine grit sandpaper- I already had some so I didn't have to buy any, yay! Once it was sanded, I cleaned it and taped off the areas I didn't want painted, like the cord, switch, etc...  Now was time to prime. I sprayed 2 coats of primer, Valspar, allowing it to dry for 20 minutes between coats.


Once it was primed and dry, I sprayed 3 light coats of white in a semi-gloss finish.


It took 3 coats to cover it completely so I'm glad I was patient- I usually try to finish projects as quickly as possible, so it was hard waiting for it to dry between coats. I just found something else to work on though:) Once the color was like I wanted, I sprayed on 2 light coats of a clear gloss. This gave it that shiny, ceramic look because the paint had made it look kinda dull. Now it matched the lamp base that was already white. Mission accomplished!


Now it was time to find lampshades! Here are some that I liked:

Love the pattern on this one but it was too small :(

Too small also...

Like this but the shade was ivory instead of white- boo.
 I finally decided on a white shade. I know, you may be thinking a white lamp with a white shade?!? But it won't limit me to certain colors that I can use for bedding, pillows, rugs, etc... And I'm going to incorporate color with accessories in our bedroom. Here are the newly thrifted lamps with their new shades:


This is the one that was originally green

This is the one that was already white

And here they are together
 I already had one of these lampshades so I just had to buy one more. Got it at Target for around $20. Here is the breakdown for this project:

2 lamp bases: $12
Fine grit sandpaper: already had
Painter's tape: already had
Spray primer: already had
2 cans of white spray paint: $6
Clear gloss spray: $3
2 lampshades: $20 (already had one)

Total cost for 2 lamps: $41


Not bad for 2 ceramic lamps! Our bedroom still has a long way to go but we're off to a pretty good start:)


What do you think?

I've linked up to Shabby Chic Cottage- check out her site for some amazing transformations!


Featured on Sew Woodsy!

Great news! My post "foot stool transformation" was featured on Sew Woodsy today! Check it out! And stay tuned for another thrift store transformation:)

 
Hope everyone has a great Wednesday! 

Friday, May 20, 2011

Tell me what's the word-

ah word up wordle! Yeah, I'm bringing back the 90s, haha!  And that will definitely make more sense later on in the post. :)

Happy Friday everyone! I hope you've had a fantabulous week! This week has led to 2 new addictions for me: Pinterest (love) and Wordle. Pinterest is like a virtual pinboard —  you can create collections of things you love and "follow" collections created by people with great taste. It's just amazing and full of ideas and inspiration! My username is mkd2137 if you want to check it out:)

Here are 2 of my pins that I'm just oohing and ahhing over. Definitely want to create something like this!


I just love gallery walls! If you remember from my post of our living room, I currently have small one, but I just like these a little better:) I think mine looks a little stuffy.


So what I'm thinking, is that I need to add a bunch more frames! I'm also thinking of painting my existing frames white and buying more white ones. All of my pictures now are black/white, which I do love, but I want to add some color! And I don't want everything to be family photos- I'm going to mix in some other prints as well. Enter Wordle...

I had used wordle when I was teaching but had kinda forgotten about it until recently.You can use Wordle to create word clouds from text. You can tweak your clouds with different fonts, layouts, and color schemes and then you can print them out, or save them to the Wordle gallery to share with your friends.

So I decided to make one for one of our favorite places- New Orleans! Matthew and I have been together so many times and also with friends and we always have a blast! (that's also where we went for my bachelorette party) We love everything about that city- the food, drinks, music, stinky Bourbon Street, you get the idea... Not to mention, Matthew has been a Saints fan since he could talk- I carried him to a Saints game for our 2nd Christmas together when they played the Falcons in Nola. So, anywho, I wanted to DIY some art to show our love for that city.

In Wordle, you just type in what you want in your word cloud. The more times you enter the same text, the larger it will appear. Example: I typed "bourbon street" 4 times and everything else was typed 1-3 times, so "bourbon street" is the largest. Make sense? It's fun to just play around with the different fonts, colors, and layouts too. This one is similar to the one I printed. Of course this is just a print screen view so when you actually print it, it doesn't have the toolbars.


So once I buy some new white frames, I'm going to add some color splash to the gallery wall using prints like this . 

What do you think? Has anyone used Wordle to DIY art?